Course Application Medicine – Mobile Devices
Types of Registration
General Registration
Prerequisite: Medical Preliminary Examination (“Physikum”)
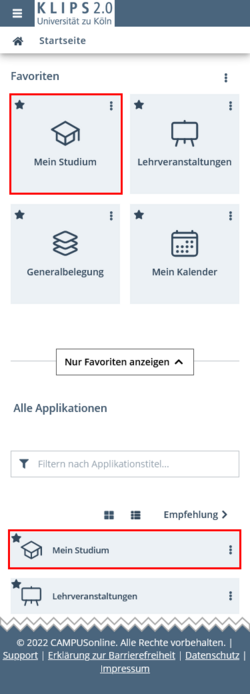
1. Go to your personal Home Screen. In the application, menu, tap on the Course Planning – Registration application.
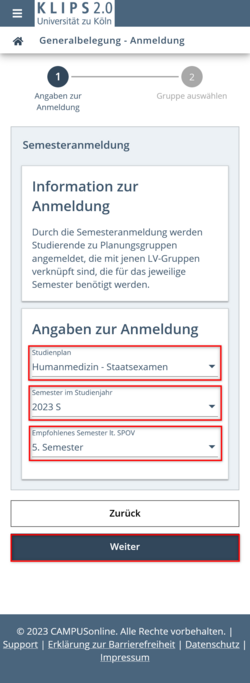
2. The application Course Planning – Registration will open. Three choice boxes will appear in the section Registration Details toward the bottom of the page. Choose:
- "Medical Studies – State Examination" in the choice box Curriculum,
- the semester, i.e. winter or summer, in the choice box Semester of Academic Year,
- for the first clinical semester "5th Semester" (or correspondingly for the following semesters) in the choice box Recommended Semester According to Curriculum.
3. Tap on Continue.
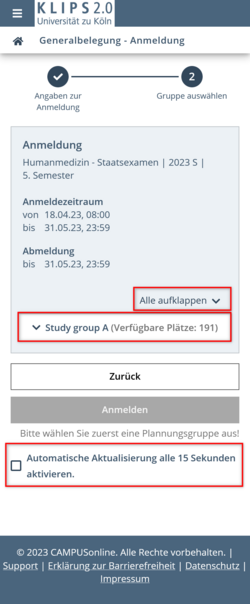
4. On the page that opens, you will initially only see the total number of available places in addition to the registration and deregistration dates.
Tap on the Expand All button to display the list of available semester/course bundles and the places available for each.
If you want, you can select the Activate automatic refresh every 15 seconds feature by ticking the box. The number of places available in the semester/course bundles is then updated at intervals.
5. After you have activated the display of the list of semester/course bundles, select the semester/course bundle that you want to register for. To do this, tap on the Radio Button on the far left of the respective list entry. By tapping on the Calendar Icon, you can call up the dates in your semester/course bundle sorted by calendar week.
6. Tap on Register.

7. The system now carries out the registration for all course groups belonging to your semester/course bundle. A message confirming your registration appears below the progress bar at the top of the page.
The page now only shows the semester/course bundle for which you have registered as well as the list of the course groups linked to that semester/course bundle. Here, too, you will find the note (highlighted in green) that you have already successfully registered for the corresponding semester/course bundle. On the left, the list of courses shows the status Confirmed Place for all entries (also in green).
8. The My Courses button takes you to the view of the same name in the Courses application.
9. If you want to deregister from the semester/course bundle for which you are registered, tap the Edit button.
Please note: If you do not deregister from your semester/course bundle right away, repeat the steps 1-7 until you return to the semester/course bundle registration page. Now, you can deregister from your semester/course bundle.

10. The list of available semester/course bundles is displayed again. The semester/course bundle you are registered for is preselected so that you cannot select any other groups. To deregister, tap the Deregister button at the bottom of the page.

11. A message that the deregistration was successful appears at the top below the progress bar. All available semester/course bundles are now activated again for selection and you can, if you wish, reregister directly.
Viewing Course Dates in Your Calendar
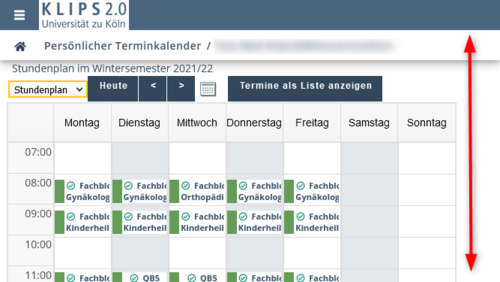
After completing your course registration in the application Course Planning – Registration you will find all your courses in your personal calendar.
1. Tap on the Home Button in the top left corner of the page to return to your personal Home Screen.
2. In the application menu, tap on the My Calendar application.
Your calendar opens. For a better view, we recommend switching to landscape mode on your mobile device.

Please note: Exam dates (marked in red) only become visible after the application period is over. Further information about the My Calendar application can be found in the chapter "Calendar".
Individual Registration
Please note: For the first clinical semester, there are 5 cases where an Individual Registration is required in addition to the General Registration.
1. Interdisciplinary Field Q2 - History, Theory and Ethics of Medicine (= "Querschnittsblock Q 2 "Geschichte, Theorie, Ethik der Medizin") (Internship)
Please note: Please ensure that the date of the internship does not overlap with another rotation internship of your group. The rotation plans can be found here: https://medfak.uni-koeln.de/20189.html
2. OSCE-1-Exam (For queries, send an e-mail to: med-osce[at]uni-koeln.de)
3. Progress Test
4. Wahlpflichtblock (Compulsory Elective Block)
5. Other faculty courses, e.g. entrance to clinical part of studies (White Coat Ceremony)
In the following, we provide an example of how to register for a course in the interdisciplinary field Q2: “History, Theory and Ethics of Medicine” (= "Querschnittsblock Q 2 "Geschichte, Theorie, Ethik der Medizin"). Registration for the other areas works in the same way.
Procedure using the example of "History, Theory and Ethics of Medicine" (Internship):
1. Tap on the My Degree Programme application in the application menu on your personal Home Screen.

2. The My Degree Programme application opens your degree programme "Medical Studies" in a dashboard view.
Please note: If you are enrolled in other degree programmes, the degree programme that was opened when you last closed the application will be displayed. To change the view, tap on the arrow button at the top left below the house symbol and select the degree programme "Medical Studies" from the drop-down menu.
3. In the dashboard module Schedule, tap on Semester Plan to switch to the semester plan view of the "Medical Studies" degree programme.

4. The view Semester Plan is displayed. Tap the three-dot menu button to open the page navigation. This allows you to quickly jump to the desired semester.
5. In the page navigation, tap on 5th semester (students in higher clinical semesters select the 6th to 10th semester at this point).

6. All modules of the 5th semester are displayed in a list view in the main menu.
7. To open a module and access the levels below it, tap on the Arrow Buttons on the left in front of the module or exam nodes. In this way, navigate via the "History, Theory and Ethics of Medicine" module to the “History, Theory and Ethics - Seminar” exam node.
8. The internship "QB2 Querschnittsblock Geschichte und Ethik Praktikum" is displayed in the list of allocated courses. To register for the internship, tap on the Go to Course Registration button.

9. The view Course Registration - Select Degree Programme and Node of Curriculum Version opens. In the selection field Degree Programme you will see your degree programme, and below it the curriculum context in which the internship is offered. Activate the Radio Button of the exam node "History, Theory and Ethics of Medicine - Seminar". Tap on the Continue button.
Please note: Depending on your mobile device, we recommend switching to landscape format from here on for a better overview.

10. The Course Registration - Select Group view opens. You will now see a list of several internships to choose from.

Please note: On the very right in the column Time/Place (1st Date), you can see the first date of the internship. By tapping the clock symbol a list all dates of the internship will open in a separate view.

11. Tap on the Register (= “Anmelden”) button next to the title of the internship for which you would like to apply.
12. A pop-up appears. Tap on OK to confirm your course place request.

13. Another pop-up appears with a summary of the details of your course place request. Tap on OK to close it.

14. The view is updated. Under Current status at the top you can now see the internship for which you have registered. You may also Deregister or Re-Register for a different internship here.
