My Degree Programme - Desktop View
Contents of this Chapter
Structure
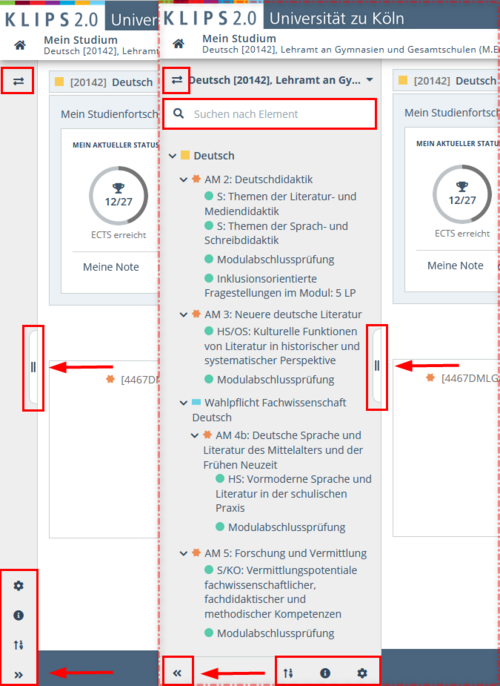
The My Degree Programme application is divided into five areas. A distinction can be made between the four elements of the main menu and the sidebar area. While the contents of the main menu change depending on the level you are at in the application, the visual layout remains constant.
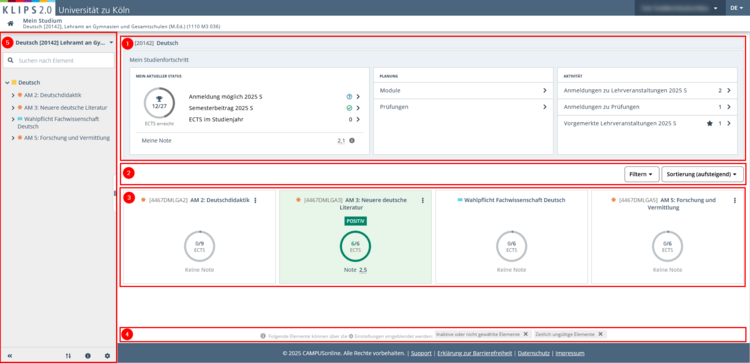
When first opening the application, you will see your study progress in the selected part of your degree programme in the upper area of the main menu (1). The My Progress of Studies section is divided into three categories: My Current Status, Schedule and Activity. If you proceed to deeper levels of the application, the current status or study progress in the selected area of the curriculum is displayed in this section.
Divided by two filter or sorting buttons (2), there is a tile menu (3) below the study progress section. Depending on the level, it displays higher-level grouping elements of the curriculum structure. According to the nesting principle, clicking on a tile opens the level of the curriculum structure (e.g. modules, courses, exams, etc.) below it.
The footer (4) of the application contains available filters for displaying the curriculun structure.
Please note: The view is dynamic and, depending on your screen resolution, the positioning of the different elements of the menu may differ from the screenshots below.
To the left of the main menu is a fold-out sidebar (5). When collapsed, this sidebar contains various settings and navigation buttons; when expanded, it also contains a search function as well as the curriculum structure of the selected (partial) degree programme in tree form. Both enable quick navigation within the application.
The individual sections are explained in more detail below.
Monitor General Study Data: Using the Dashboard
The dashboard at the top is divided into several segments. At the top, you can always see which part of your degree programme's curriculum structure is currently opened. When first opening your (partial) degree programme, you will e.g. only see the degree programme number and the name of the degree programme.

Once you open more tiles in your degree programme, your click path will be documented here. If you want to move back along the path, clicking on the desired part of the path will redirect you to the relevant position in the curriculum structure.

Below the click path, you will always see the current study progress of the opened element of your curriculum. The display adapts according to your selected position in the curriculum structure.
When you first open your (partial) degree programme, the dashboard My Progress of Studies appears. It summarises all activities in this (partial) degree programme.
On the lower levels, you can also see your study progress here, but limited to the grade and/or ECTS credits achieved in the selected element (e.g. within a module).
The status display My Progress of Studies is divided into three boxes or modules, which provide an overview of different areas of your studies.
1. My Current Status

In the My Current Status box, you will first see a progress wheel showing how many of the required ECTS credits you have already achieved in your (partial) degree programme (12 out of 27 in the example).
This is followed by the display Registration Possible for the current semester. Click on the link to open the Study Status - Detail View window. Here you can see whether you are correctly enrolled for the current semester and whether you are therefore allowed to take courses and exams for the semester in question.

Under Semester fee you can see whether you have paid your semester fee correctly or whether there are any outstanding or overpaid amounts for the current semester.
A green tick indicates that there are no outstanding amounts. It also appears if an amount in excess of the semester fee has been paid. In this case, the overpaid amount is also displayed.
An orange triangle indicates an outstanding amount. The outstanding amount is also displayed.
A click on the link will take you to the application Semester Fees where you will find a detailed breakdown of the semester fees, the payments received and the account information of the University of Cologne.

Finally, the box displays the ECTS in Academic Year, which shows the ECTS credits earned in the current academic year. Click on the link to open a detailed view in which the credits earned are grouped by semester and academic year. The allocation of the course to a specific semester is decisive for the display. For example, an achievement that is completed for a course in the winter semester is always counted for this winter semester, regardless of date when the achievement itself was completed.
To access a list of your completed credits in the selected (partial) degree programme, click on the button Show All Achievements. You will be redirected to the My Achievements application.

If valid credits have already been recorded for you in the selected (partial) degree programme, the current grade for this degree programme will also be calculated based on these credits and displayed in the My Current Status-box.
2. Schedule
In the middle box of the dashboard My Progress of Studies you will find the section Schedule. This dashboard module provides you with a condensed overview of your progress in the areas Modules or Exams. You may also bookmark not yet started elements of the curriculum for planning purposes.
To do this, click on the arrow button in the corresponding line to open the Modules or Exams views of the My Degree Programme application.

Both views are divided into the sections Completed Successfully, In Progress, Bookmarked and Not Started Yet. Each section shows the elements of the curriculum structure corresponding to the respective status. The sections are linked to the progress bar at the top: each successfully completed element of the curriculum and each element that is in progress or bookmarked fills the progress bar accordingly, with each status visually assigned to a color or symbol.
You can use the page navigation to jump more quickly to the relevant categories.
Please note: The categories "In Progress" and "Completed Successfully" are only displayed as soon as registrations or results are available.
In the respective sections, you can expand the individual elements to view the corresponding courses or exams offered.

You have two options for assigning an element of the curriculum structure to the Bookmarked section:
1. Click directly in the planning overview on the Bookmark Symbol on the right in the line of the corresponding element. The planning view is updated. If necessary, use the "Reload" function of your browser.

2. Navigate via the tile menu of the My Degree Programme application to the desired element and click on the Bookmark Symbol. When you open the planning view, you will now find the element in the corresponding section.

To exit the planning view, click on the Back-button in the page navigation. You will be redirected to the start screen of the (partial) degree programme.
3. Activity
To the right of the Schedule box in the dashboard, you will find the Activity box, which provides links to the following options:
- Course Registrations
- Exam Registrations
- Bookmarked Courses
- Unassigned Achievements (if applicable)

All options indicate the number solely for the selected (partial) degree programme.
Click on the Arrow Button of the respective option and you will be redirected to the linked views of the applications Courses (= My courses or My Bookmarked courses) or Exam Dates (= My Exams). There you will find the lists of your courses with course place requests, bookmarked courses and registered exams.
In the case of the option Unassigned Achievements, you will also be redirected to a corresponding list where you can assign the achievements to a proper curriculum context. Further information can be found in the section "Allocating Unassigned Achievements to Curriculum Contexts" in the chapter "Transferring Credits".
Customize the Display: Using Filter and Sorting Options
You will find a filter and a sorting button below the study progress dashboard.

1. Using Filters
Using the filter button, you may filter the display according to several criteria in the Courses and Exams categories.
Click on the Arrow Button to open the filter options in the desired category:
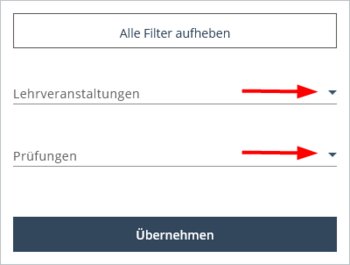
The following options are now displayed:
Courses:
- Registered for the Course
- Course open for Registration
Exams:
- Registered for the Exam
- Exam open for Registration
- Exam Registration Possible in Future
To select an option, tick the check box in front of the desired option(s) and then click on the Apply.

Only the elements that match your filter criteria will be displayed in the tile and page navigation.
Please note: The filter is inherited across the levels: for example, if you have selected Registered for the Course as the filter on an upper level of the curriculum structure, only the courses for which you have submitted a course place request will be displayed at the lowest level.
Activated filters appear below the filter and sorting button and can be deactivated by clicking on the x button without having to open the filter menu again.

2. Using the Sorting Options
In addition to the filter option, you also have the option of altering the sorting of the display in the tile menu or in the sidebar.
The following sorting options are available to you:
- Sorting (ascending / descending) = Sorting according to module hierarchy in curriculum structure
- Name (ascending / descending) = Alphabetical sorting
- ID (ascending / descending) = Sorting by ID number of the higher-level module
First click on the Sorting Button next to the filter button to open the options menu. The currently selected sorting option is always displayed on the button.
Then select the desired option by clicking again.

Please note: Changes to the sorting affect both the tile menu and the navigation in the sidebar.
You can also change the sorting using the Arrow Button at the bottom of the sidebar. It works in the same way as the sorting button.

3. Filtering Courses by Course Type or Semester
At the level of exam elements (i.e. courses and examinations), you also have the option of filtering courses by Search Term (title, course number etc.) and sorting by course type and semester.
Use the Search Field (1) for filtering and the Sorting Button (2) for sorting by Course Type/Semester.

Sorting is based on the following parameters:
- Semester
- Semester
- Title
- Course type
- Course Type
- Semester
- Title
Monitor Study Progress and Navigation: Using the Tile Menu
1. The Tile Navigation
The tile navigation of the My Degree Programme application works according to the nesting principle. Each click on a tile in the main menu takes you one level deeper into the curriculum structure until you finally arrive at the courses for which you can submit course place requests or reach the exams for which you can register.
The levels follow a hierarchy: at the top is the degree programme, followed by the grouping element (= rule node), below that the allocated modules (= module node) and at the lowest level the various exam elements with the allocated courses and examinations (= exam node).
In the example below, you can see a grouping element at the top level ("Wahlpflicht Fachwissenschaft Deutsch") and three further modules ("AM 2: Teaching German" ("Deutschdidaktik"), "AM 3: Modern German Literature" (“Neuere deutsche Literatur”) and "AM 5: Research and Imparting Knowledge" ("Forschung und Vermittlung“)). There are further levels under each of these tiles: this is clearly visible in the curriculum tree structure if you expand the sidebar.

If you click on the grouping element as in the example (here: "Wahlpflicht Fachwissenschaft Deutsch"), the level below opens, which contains two modules: “AM 4a: Language: Structures and Functions” ("Sprache: Strukturen und Funktionen") and “AM 4b: Medieval and Early Modern German Language and Literature” ("Deutsche Sprache und Literatur des Mittelalters und der frühen Neuzeit").

Now click on the first of the displayed modules to open the level below. Two exam elements are allocated in this example: “HS/OS: Daten und ihre Analyse oder Anwendung empirischer Methoden” ("Data and Its Analysis or Application of Empirical Methods" and “Modulabschlussprüfung” ("Final Module Examination"), respectively.

If you now click on the exam element “HS/OS: Daten und ihre Analyse oder Anwendung empirischer Methoden” ("Data and Its Analysis or Application of Empirical Methods"), the courses allocated to this exam element will be displayed.

Here, you have the opportunity to register for courses or, respectively, for an exam in the “Modulabschlussprüfung” ("Final Module Examination") element when registration periods are active.
You can find out how to submit course place requests in the chapter: Applying for Courses.
You can find out how to register for exams in the chapter Registering for Exams.
2. Monitoring the Progress of Your Studies
The tile menu provides information about your progress in the individual modules of your degree programme. Each grouping element or module shows how many ECTS credits you need in this area and how many you have already earned, or which have not yet been started and which have already been successfully completed. This makes it easy for you to keep track of the areas of your degree programme in which you still have to attend courses and take exams.
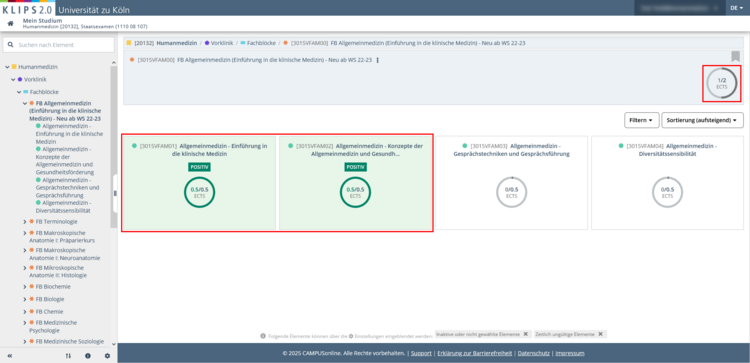
In the following example, 28 out of 155 ECTS credits have already been earned in the “First Section of Medical State Examination” ("Vorklinik") of the "Medical Studies" degree programme according to the progress wheel at the top right of the screen. The grouping elements (= rule node) in which the credits were earned are indicated by the progress wheels of the tiles displayed at this level.

Most ECTS credits were earned in the core subjects (26 out of 95). If you now click on this tile, the overview with the study progress in the individual subordinate modules is displayed. Modules that have not been started, modules that have been started and modules that have already been successfully completed are clearly indicated by the progress wheels. Completed modules are colored green and are also marked as Positive.

If you click on a module you have already started and have already earned ECTS credits for, you will be shown which elements of the module you have already completed and which are still incomplete.
If you click on a completed, positive module, the color of the progress wheel at the top right changes from grey to green.
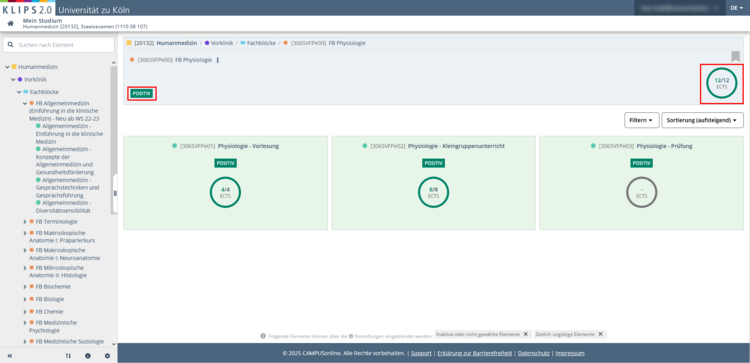
If you click on one of the positive exam elements, the course or exam for which you have earned ECTS credits in this element will be displayed at the top of the list of courses or exams.
If you click on the grading on the far right of the list view, you will automatically be redircted to the My Achievements application.

If a grade is awarded for a module or course, this will appear within the progress display of the respective tile or dashboard.


In some cases, you must first fulfill certain requirements before you are allowed to apply for courses or register for exams in a module. In this case, Requirements will be noted on the corresponding tile and the tile is colored yellow.

Click on the link to obtain further information.
An explanation and a list of the requirements that must be achieved before you can take or complete the selected element will appear.

Switch Degree Programmes, Show Quick Navigation and Inactive Elements: Using the Sidebar
The expandable sidebar of the My Degree Programme application offers additional settings as well as the option to navigate and search even faster in the curriculum structure. To use all the functions of the sidebar, such as the curriculum tree navigation or the search function, it must be expanded. The collapsed sidebar is sufficient for a use reduced to the functions of the buttons.
To collapse or expand the sidebar, either click on the Slider on the right, middle edge of the bar, or on the Arrow Button at the bottom of the sidebar.
Please note: Depending on whether you use the sidebar collapsed or expanded, the sidebar buttons are in different positions: one below the other when collapsed, when expanded, at the top left and at the bottom of the footer.
1. Selecting Degree Programme
If you are studying a single subject degree programme, this subject will be displayed once you open the application.
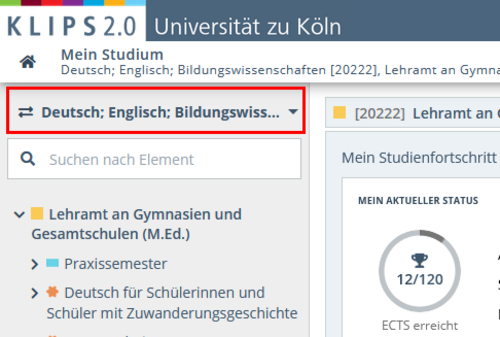
If you are studying a degree programme with more than one subject, the application initally opens the subject of your degree programme that comes first in alphabetical order.
To switch to the curriculum structure of another subject of your degree programme, click on the Arrow Button at the top of the sidebar, directly below the House Symbol.
Please note: This button only appears if you are enrolled in a multiple subjects degree programme.

This opens a Selection Menu which lists the subjects of your degree programme. The currently selected subject or partial degree programme is highlighted in gray and marked with a checkmark.
Click on the Partial Degree Programme that you would like to display.
Please note: In the view of the complete degree programme (in the example below “German; English; Educational Sciences [20222] Lehramt an Gymnasien und Gesamtschulen (M.Ed.)" (”Teaching degree for grammar schools and comprehensive schools (M.Ed.)"), you will find, the modules for your thesis and the courses offered for the Studium Integrale or the extracurricular courses.

The application display switches to the start page of the selected part of your degree programme.
Please note: If you are enrolled in a Master's degree programme and also completed your Bachelor's degree at the University of Cologne, the individual parts of your Bachelor's degree programme will also be listed, albeit greyed out.

2. Navigating with the Tree Structure
The tile view in the main menu and the tree structure of the degree programme in the sidebar of the My Degree Programme application differ in that the tile view only displays the grouping elements of the currently selected level in the curriculum structure, whereas the tree structure in the sidebar can display the entire structure of the degree programme at a glance.
When you open your degree programme, the curriculum structure is initially displayed in a collapsed form. By clicking on the Arrow Buttons in front of the respective node elements, you can expand or collapse the curriculum structure.

If you click on one of the elements, the tile menu will update to show the corresponding location. This allows you to quickly jump to a module or offered courses or exams.

3. Searching in the Curriculum Structure
The Search Function of the expanded sidebar provides you with an additional option for quick navigation in the curriculum structure of the selected part of your degree programme.
If you enter "AM2", for example, as in the example below, only the corresponding element “AM 2: Teaching German” ("Deutschdidaktik") will be displayed (see screenshot). The filter works dynamically, i.e. the more letters of a search term are entered, the more results are excluded.
Click on the module you are looking for to display it in the main menu.
To delete the search term, click on the X in the search field. The sidebar will display the complete curriculum structure again.

4. Showing and Hiding Inactive or Not Currenctly Valid Elements of the Curriculum
The curriculum structure of the My Degree Programme application shows the individual modules of your degree programme as defined in the subject-specific annotations to your exam regulations. Each element of this curriculum structure is referred to as a node .
The curriculum structure of your degree programme is divided hierarchically into various node elements, to which further node levels are added, up to the exam node at the lowest level.
A symbol is assigned to each of these node levels. You will find these symbols both in the main menu and in the tree structure of the curriculum.

The most important node elements of the structure are explained in more detail in the following table:
| Node type | Abbreviation | Symbol | Definition |
|---|---|---|---|
| Grouping element (=rule node) (object) | RKN | blue bar | Rule nodes are used to group or structure the SPO-version.
|
| Module (= module node) (object) | MKN | orange star | Main node of 'module trees'. |
| Exam (= exam node) (object) | PKN | turquoise circle | Exam nodes list courses or exams that are available for exam or course registration. |
You can also find a list of the different node types with explanations by clicking on the Information button in the sidebar.

In a few cases, individual module or exam nodes may not be displayed. There may be various reasons for this.
One possibility is that an exam node was only valid in the past or will only be valid in the future. Such a node is displayed in KLIPS 2.0 as a Currently Not Valid Node . Currently not valid nodes ensure that students can still register for exams in expiring modules in the current semester, or can already enrol in the new modules in the registration periods for the next semester.
Another possibility is that the node is Inactive in KLIPS 2.0. Active nodes in the curriculum structure become inactive nodes if, for example, the required number of elective modules has been selected in an elective area or modules with the required number of credits have been selected.
These are not listed in the standard view of the My Degree Programme application, but can be displayed as described below.
Via the Gear Button at the bottom of the sidebar, you can adjust the settings in the display of your (partial) degree programme.
To do this, click on the button to open the corresponding selection menu and adjust the display of the curriculum structure by clicking on the desired option.

The following options are available to you:
| Option | Explanation |
|---|---|
| Show/hide inactive elements | Inactive elements refer to parts of the curriculum structure that have been excluded, e.g. by choosing a specialisation or fulfilling achievements in an area of the curriculum structure. |
| Show/hide positive elements | Positive elements are elements of the curriculum structure in which all required achievements have been successfully completed. |
| Show/hide elements not currently valid | Elements not currently valid are exam elements that were valid in the past or will only be valid in the future. |
The settings menu is directly linked to the footer of the application. You can use this to show all hidden elements of the above options directly with one click.
To do this, click on the X next to the relevant option to activate the filter.

Elements not currently valid or inactive elements are now highlighted both in the main menu and in the tree structure in the sidebar.

If the desired option does not appear in the footer, the elements are already displayed.
To hide elements again, you can select the desired options via the Settings menu as described above.