Registering for Exams - Desktop View
1. Click on the My Degree Programme application in the application menu on your Home Screen.

2. The application opens the start page of your degree programme. If you are studying more than one subject, it opens the part of your degree programme that comes first in alphabetical order.
3. If you would like to register for an exam in another subject of your degree programme, first click on the Arrow Button at the top of the sidebar.

4. All parts of your degree programme will now be displayed in a selection menu. The degree programme currently displayed is highlighted in grey and marked with a tick. Select the part of your degree programme in which you would like to register for an exam by clicking on the corresponding list element.

5. The start page of the selected part of your degree programme is displayed. Navigate to the desired exam element by clicking on the tiles. In most cases, this is the “Modulabschlussprüfung” ("Final Module Examination").
A list of the exams allocated to this element will open, sorted by semester. The Semester Indicator for the current semester is highlighted in blue.
If one or more exam dates have already been entered into KLIPS 2.0, you will find a slider selection on the right-hand side of the respective list entries with the most important information on this/these exam(s): date of the exam, name of the examiner(s) and the status of the registration (e.g. "not registered"). Below this is a button that is labeled differently depending on the registration status:
- Go to Exam Registration (= not registered)
- Go to Exam Deregistration (= already registered)
- Change to this Exam Date (= already registered, this is an alternative exam date)
Please note: If registration periods for an exam are not yet active or have already expired, no button is displayed. The same applies, if the deadline for deregistering from an exam has already expired. If the message "No exams found for this course" appears, you may be looking at a future semester for which no exam dates have yet been entered.
If there are several exam dates in a semester, this is indicated by the corresponding number of dots below this button.
6. You can use the Navigation Arrows to the right and left of the button to switch to the desired exam date.
If there is currently an active registration period for the exam and there is no registration for another exam date saved for this exam element, the selectable exam dates are indicated by the Go to Exam Registration button.

7. It is also possible to filter exams in advance by using the filter button on the right above the list. To do this, click on the Filter button.
8. A selection menu opens. Open the filter selection for Exams by clicking on the Arrow Button.

9. Several filter options are available to you:
- "Registered for the Exam"
- "Exam Open for Registration"
- "Exam Registration Possible in the Future"
10. Select the desired option by clicking on the checkbox in front of the option and then click on the Apply button.

11. The list is updated and the selected options are now displayed below the Filter button. If you want to deactivate one (or all) filter options, click on the X in the filter display.
12. To register for an exam, click on the Go to Exam Registration button.

13. You can also register for exams via the Detailed View of the exam. This is especially useful, for example, if a large number of exam dates are allocated to one exam (usually a “Modulabschlussprüfung” ("Final Module Examination")) or if additional information that is not visible in the compressed slider selection must be observed for a correct registration.
14. Open the Detailed View by clicking on the title of the exam and navigate to the section Exam Information.
15. Here, you will find all the exam dates allocated to this exam in list form. The list view contains all the registration information provided. Please note the information under the Information Icon and click on the Go to Exam Registration button of the desired exam.

Note: In some cases, individual module or exam nodes may not be shown. In these instances, the missing nodes may be inactive or not currently valid. Further information on inactive or not currently valid elements can be found in the "My Degree Programme" chapter.
16. The view switches to the exam registration page in the application Exam Dates. Here, you can see all the information about the selected exam date at a glance: exam type, exam number, title, semester, date, time, location, examiner, organisation, registration period, the last deregistration date, the number of participants currently registered and the exam mode.
Check in the drop-down menu Choose Degree Programme whether you have selected the correct part of your degree programme.
Check in the drop-down menu Select Curriculum Context whether the correct curriculum context has been selected.
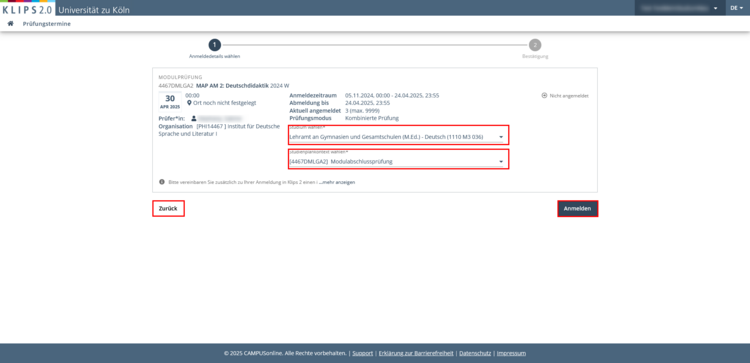
Sometimes an exam is allocated to several curriculum contexts. This is possible, for example, in the case of course examinations as part of Extracurricular Courses (see screenshot). If this is the case, you may adjust the curriculum context at this point, if necessary. Click on Select Curriculum Context and select the desired curriculum context from the drop-down menu by clicking on it.

Please note: As soon as you register for an exam within the framework of an elective compulsory module, you are committing to this elective. You may not undo this choice by yourself. Only the responsible department/institute can retract or edit this.
17. Now click on the Register button.
18. The page updates. You will see a message at the top indicating that you have successfully registered. The overview of the exam now also shows your status as already registered.

19. Clicking the My Exams button takes you to the list of your registered exams in the Exam Dates application. The exam you have just registered for will now be displayed there.
Clicking on the Go to All Exams button takes you to the All Exams view in the Exam Dates application. The general overview of all available exam dates in KLIPS 2.0 is displayed.
20. If you would like to register for another exam, click the House Symbol to return to your personal Home Screen and reopen the application My Degree Programme. Repeat the steps described above.