Organising Bookmarked Courses – Desktop View
Contents of this Chapter
Configuring Default Settings
1. Click on the Courses application in the application menu on your personal Home Screen.

2. The application opens in the view My Courses. Click on the tab My Bookmarked Courses to switch the view.

3. The view My Bookmarked Courses opens. Check in the top left area of the list if the correct term is selected. By default, the view opens the bookmarked courses of the current semester, or, respectively, the bookmarked courses of the coming semester once the courses offered for the new term have been released in KLIPS 2.0.
4. Click on the Gear Icon next to search bar.

5. The window Notification Options opens.
6. Activate the checkboxes for those options that apply to you to receive e-mail notifications. By clicking the “i”-Icon you can open further information for the individual notification options.
7. Click Apply to save your personal settings.

Adding Course Bookmarks
1. To add a course to the list of your bookmarked courses, click on the Courses application in the application menu on your personal Home Screen. The application opens in the view My Courses. Switch the view by clicking the tab All Courses.

2. The view All Courses opens. The courses offered by the University of Cologne will be displayed. To view only the courses offered in your degree programme, click on All in the filter Curriculum. Select the desired part of your degree programme, in this example “Betriebswirtschaftslehre”(“Business Administration”). Check the filter Term to make sure the correct semester is selected.
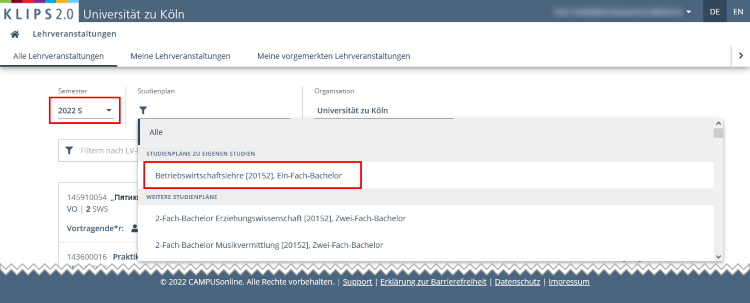
3. The list updates.
Please note: If you want to limit the search results of your list further, or if you are searching for a specific course, you may use the search bar and enter the title of the course, the course number or the lecturer.
Beside each course title, there is a Star Symbol:
 means that a course is not yet bookmarked and can be added to your list.
 means that this course has already been bookmarked.
4. By clicking the Star Symbol, you can add a course to the list of your bookmarked courses. Clicking it once again will remove the course from your list.
Please note: If you have already entered a course place request for a certain course, clicking the star symbol to remove the bookmark, will only remove the bookmark for the course group you are registered for. It will not remove the bookmark for the course as such.

Please note:
Creating a bookmark does not mean that you applied for a course. In order to enter a course place request, please follow the instructions in the chapter “Applying for Courses”:
It is possible to register for a course in the view All Courses by clicking the Go to Course Registration button, if the course is allocated to your degree programme. This is not always the case in the view All Courses. We strongly recommend using the application My Degree Programme to register for courses (see above). In this application, you will be guided through the module structure of your degree programme. This makes it easier to choose courses according to the module requirements of your programme.
Should you use the Go to Course Registration button to register for a course, you may be informed upon clicking that a registration is not possible as the course is not allocated to your degree programme. Please check if the correct degree programme is selected in the drop down menu Degree Programme and, if necessary, adjust your selection. If the notification remains that you cannot register, the course is indeed not allocated to your degree programme.
If you have not applied for a course yet, bookmarked courses will only be shown in your Calendar if this option is activated in your settings. If activated, bookmarked courses without a course place request will be marked with a grey arrow in front of the course title. Please refer to the chapter "Calendar" for further instructions.
Opening and Editing Course Bookmarks
1. To open the list of your bookmarked courses, click on the Courses application in the application menu of your personal Home Screen. The application opens in the view My Courses. Click on the My Bookmarked Courses tab to switch to the list of your bookmarked courses.
2. The list of your bookmarked courses opens. Check if the correct semester is selected.

The list shows bookmarked courses regardless of whether you have already entered course place requests for course or not.
Please note the following:
If no course place request has been entered yet, the Status on the right hand side of the list item will be either “Course Open for Registration” or “Course Registration to be Opened”. If registration is no longer possible, the status is shown as “Registration Expired”. In all other cases the status of the entered registration will be shown: “Place Request Entered”, “Place on Waiting List” or “Assigned Confirmed Place”.
By clicking the “X”-Button next to the button Go to Course Registration, you can remove a course from your list of bookmarked courses.
Beside the title of a course, it is shown how many course groups are bookmarked (e.g. “1/2” or “1/1” if there is only the standard group).
By clicking on the Arrows to the left and right of each list item, you can open additional information on the course: clicking the left Arrow will open information regarding time, place, lecturer and course group. If you entered a course place request for one or more course groups, only information for those specific course groups will be shown. If you have not entered a course place request, the information is displayed for all available course groups. By clicking the right arrow, you open the course details view of a course.
If the course registration and deregistration period for a course is currently active, the button Go to Course Registration will open the course registration or deregistration. Please take note of the above notices regarding course registration proceedings. If course registration and deregistration periods have expired the button changes to View Course Registration Details.